Tips to get rid of Unwanted hair-Natural tips to remove Facial hair

Facial and body hair in women is considered unfeminine and is quite embarrassing for many women. The good thing is there are many methods to get rid of unwanted hair. We will discuss some common methods here.

1.Bleaching
Bleaching is a method in which facial bleaching cream is used to lighten the color of the hair, thereby making it less noticeable. Ready made facial bleaching creams are available in the market or beauty supply shops. First do a patch test as instructed on the cover, if you experience redness or irritation, do not use the cream otherwise you can go ahead. Bleaching helps to conceal only fine hair and is not suitable for thick hair. Persons with sensitive skin should avoid bleaching.
2. Shaving
Shaving is the quickest and the easiest method to get rid of unwanted hair. But women should avoid this method for facial hair.This is best suited for underarms and hair on the legs and hands.  Never dry shave. Apply lot of moisturizer on the area to be shaved and use long upward stokes. Shave in the direction your hair grows. Also use a sharp blade as this helps to avoid razor rashes. The disadvantage in this method is that the hair grows back within a few days and one has to shave frequently.
3.Threading
According to Wikipedia, threading is an ancient method of hair removal originating in the Eastern world.  In more recent times it has gained popularity in western countries. It involves using a simple cotton thread to grasp and pull unwanted facial hair. It should be done by a beautician or professional expert.  Side effect can include skin reddening or puffiness, and changes in skin pigment.
4.Tweezing
Tweezing helps to remove a few stray hairs but is not useful for removing a large area of hair. In tweezing single hairs are pulled out one at a time with a help of tweezers available in the market for this purpose. It can be done on the eyebrows and upper lips. Tweezing is very painful and repeated tweezing can leave  small scars. One can rub ice cubes on the area before and after tweezing as it helps to reduce pain. One should not pluck hair from moles and warts.
 5.Waxing
Ready made wax is available in the market for this purpose. Wash and clean area to be waxed. Apply wax evenly in the direction of hair growth using the applicator given along with the pack. Place and press a strip of cotton cloth on top of it and smooth it out. Pull the strip of cloth quickly in opposite direction of hair growth. Waxing is more painful, but will come out smoother and last longer than shaving. You can make use of ready made wax strips available in the market. The strips are easier to apply and they also contain moisturizer as well. If you have sensitive skin waxing can result in bumps and swelling.
6.Depilatories    
Depilatory creams contain chemicals which dissolve the keratin present in the hair. Always do a patch test before using the cream. Wash the area to be depilated. Dry it well with a towel. Apply the cream with the spatula given along with the pack and follow the instructions given on the packet. Wipe off the cream using a wet cloth to remove hair. Wash area well with water and pat it dry. People with sensitive skin are strongly advised against using these creams. This is suitable for underarms, legs and hands.
Natural remedies/Home tips for Unwanted Facial Hair: 
1.Lemon juice is a natural bleaching agent. Mix gram pulse flour (besan), wheat flour, milk cream, a few drops of fresh lemon juice,  mustard oil and water together. Rub this paste in circular movements and wash it off. Do it regularly. Start this treatment from an early age as hair is soft and fine at that time.
2.Mix sugar, water and lemon juice to a thick paste. Apply it and wash it off when it dries. Do this once a week to prevent hair growth.
3.Mix 2 tsp of barley powder with little milk, few drops of fresh lemon juice and make a paste. Apply it on your face, remain for 15 minutes and wash it off with warm water. If done regularly, you can get of fine facial hair.
4.Take equal quantities of moong dal powder, neem leaves powder, kasturi manjal powder and few kuppai meni leaves. Grind it to a  paste with very less water. Apply on skin and leave it to dry. After 15-20 minutes, scrub your face gently in the direction of hair growth to remove unwanted fine hair.
These  natural remedies, if  followed regularly, discourage hair growth over a period of time. It also helps to get rid of very fine facial hair on upper lips and chin.
Electrolysis and laser treatment are also effective ways to remove hair and reduce hair growth but should be done by licensed professionals in that field.

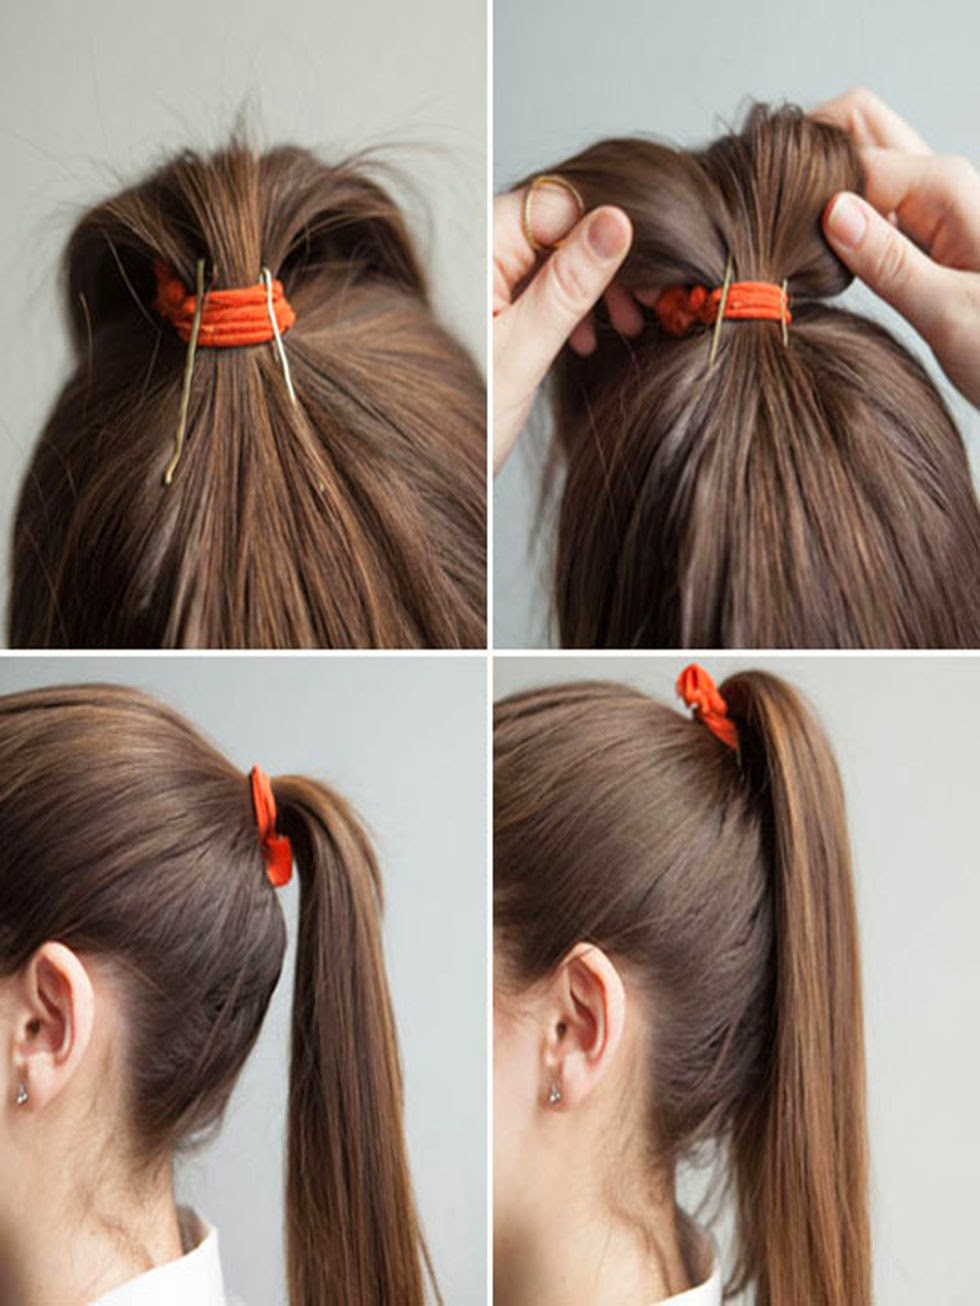
11 LIFE-CHANGING PONYTAIL HACKS


Later boring pony! Take your ponytail game to the next level, with these super-easy tricks and upgrades.
1. Wrap small piece of hair from the bottom of your ponytail around the base to conceal your elastic. Use bobby pins to secure. 

2. Use a flat iron to flip the bottom of your pony out, creating a retro style. 


3. Wrap small sections of hair from each side of your head around the base to get a cool, twisted look. 


4. Use dry shampoo to add texture to your 'tail. 


5. Prop your pony up with two bobby pins for max height. 


6. Create a sideways bow by making a loop with your tail and wrapping a piece of hair around the middle of it. 


7. Twist your hair over to one side for a cute twist on the side ponytail. Use bobby pins to hold into place.


8. Tease your crown before pulling your hair back for a modern bouffant.


9. Braid or twist side pieces in the front before pulling hair back to keep shorter layers from frizzing or falling out.


10. Fake a longer 'tail by stacking two or three ponytails on top of each other. 


11. Amp up a basic high pony by wrapping a hair elastic every few inches going down the 'tail. Pull apart the sections lightly making a messy-chic look. Experiment with different color elastics for a fun vibe.


QUICK CURLS DIRECTIONS


Hello gorgeous! With Valentine's Day around the corner you're probably already planning your perfect outfit for your special night out. Have you thought of a fabulous hairstyle to go with it yet? I'm a sucker for soft curls, but truthfully they can take me a while so I tend to put them off; that's not the case recently since my beauty guru Olivia Smalley shared the "Quick Curls" with me!


What I loved so much about these curls is that they gave me volume, which is something I'm always missing when I do my own curls. So grab your curling iron and give this a try for your next night out! Your man will be sure to do a double take!

QUICK CURLS DIRECTIONS

  1. Gather all hair from the back and create a ponytail at very front of your head.
  2. Figure out where you would like to part your hair; if it is in the middle you would take the ponytail and split it in equal parts, if it is off to the left, the right side would have more hair, etc.
  3. With a 1-inch curling iron, wrap the curls away from your face and continue until the entire pony is curled.
  4. When curls are cooled, release then from elastic. Shake out locks and spray with a flexible hold hair spray.

Tip: For added volume tease roots and add a waterless hair spray. Allow hairspray to dry before brushing and perfecting the completed look.


Advanced Shading for the Eyes

So, you’ve been wearing cosmetics for a while and you feel you’re ready to get a little more adventurous with your eye make-up. Or, perhaps you’ve gotten into a rut and just want to re-evaluate what has become a habit and correct some possible mistakes. Whatever your reasons, you are reading this because you want to know more about using your eye shadow more effectively.

It’s easy to misuse a product like eye shadow. I mean, for many women the choice of eye color is based entirely on the outfit they’re wearing. It’s a means by which you can add a touch of blue to your eyelids to reflect the color of your new blouse. And in ages past, eye color cosmetics have given us countless psychedelic and extreme looks designed to BE fashion statements in and of themselves.

But eye shadow can be so much more. Sure, you can choose colors based on the overall look you’re trying to achieve, and coordinate the eye color to your ensemble, but you can also choose shades that both appeal to your sense of style AND bring out the best in your eyes. Eye color can be used not only to add color and sparkle, but can make your natural color appear more vivid and can even minimize slight flaws and difficulties in your facial balance.

Let’s look as some of the ways you can alter the look of the eyes with shadows.

Contouring Eye Color

Some women find that their eyes aren’t as “deep” as others and they lack some of the natural “shading” that comes as a result. Skillful use of eye shadow can correct this (and can be simply used to enhance the contours that already exist on an individual). The trick is to use darker colors along the lines where there would normally be deeper creases and indentations (or in the creases and indentations that exist to deepen their appearance).

This technique involves using three coordinating shades of eye color – one light shade, and dark shade and one that’s somewhere in the middle. Start by applying the middle shade across the upper eyelid and extending it outward toward the outer tip of the eyebrow (if desired). The exact area covered by this shade is up to you, so feel free to adjust it as you desire. Follow this by applying and slim line of shadow along the top edge of the lower lid beneath the eyelashes.

Next, create (or emphasize) a crease between the eyelid and brow area by using the darker shade in that area concentrate on the crease for the heaviest area of application and use a lighter touch as you go up along the brow bone. This should follow the upper line of the eyelid area color application.

Finally, use your lighter color along the brow bone just beneath the eyebrow in order to make this area stand out more prominently. The interplay between the lighter and darker shades will make the brow stand out and the darker area (the crease) recede making the eyes appear deeper. You can also enhance the color of the eyes by using specific color palettes, but we’ll discuss that in a moment.


Close-Set Eyes

For those individuals whose eyes are set close together, eye shadow can be used to create the illusion that the eyes are spaced further apart. This is done by using the shadow colors to darken the outer boundaries of the eye area and thereby make the space between the eyes appear more prominent by comparison. The overall effect is a more balanced appearance in the facial features.

To achieve this effect, we use a three-shade palette of shadow color – one light, one medium level, and one dark. Start with applying the medium-level shade to the upper lid of the eye, expanding the “lid area” slightly toward the outside of the face. Once the upper lid is shaded, use a thin line of eye color along the underside of the lower lid’s lashes and merge it at the outer corner of the eye. Next, apply the darker shade into the crease of the eye and expand that area as you make your way to the outside of the eye. You should also intensify the application to darken the outer edge of the eye.

Finally, use your lighter shade to create a paler ridge along the underside of the brow bone in the eye socket. This can expand as you approach the outer edge of the eye, forming a clean demarcation line, or fading out with subtle blending. The key thing to remember is to keep the darkest shading to the outside of the eyes in this situation.


Wide-Spaced Eyes

When your facial challenge is wide-set eyes, the goal is to minimize the appearance of that space between your eyes. This makes the lighter areas around the features appear more prominent and can give the illusion that the eyes are moved closer together.

Once again, this effect is created using a trio of eye color shades – one light, one dark, and one somewhere in between. As with other application techniques, you should begin by applying your middle shade to the upper lid of the eye, but in this case try to keep the eye color confined to the natural shape of the lid. Follow this by applying a slim line of the eye color to the lower lid, just beneath the line of the lashes.

Once this base color is in place, you can begin the contouring by applying the darker shade to the inside corner of the eye socket. Be careful to avoid moving too far inside beyond the boundary of the eyebrow as you don’t really want to build up color onto the bridge of the nose. This darker shading should be darkest at the inside of the eyes and taper sharply in a curved line to the outer edge of the upper lid.

Use your lightest shade to enhance the brow bone under the eyebrow on the outer corner of the eye. This will make the outside of the eye appear more prominent and help to create the illusion that the eyes have been “shifted” inward.


Choosing Color Palettes

The choice of your color palette for eye shadow is typically based on your general viewpoint as to the purpose of eye shadow. Some people consider eye shadow to be something of a fashion accessory, and will use colors to compliment an outfit or tie a look together. Others look to eye shadow as a means to enhance to overall appearance. The outfit worn certainly influences the hues that are selected, but it isn’t the sole consideration.

When selecting an eye shadow palette, another benefit that can be achieved from the choice of color palettes is the enhancement of the natural eye color. Anyone who’s done any study of color theory understands the principle of “Complementary Colors”. A color is “complemented” by the color directly opposite it on the color wheel. “Complemented” means that the color is “completed” and it refers to the fact that combining these colors (a primary color with a secondary color) represents all the colors of the wheel combined.

Therefore the primary colors of Red, Blue and Yellow are complemented by Green, Orange and Purple. When a color is paired with its complement, they appear sharper and brighter. This can be a benefit when the theory is applied to eye shadow application. Choosing the right color palette for your eye shadow can help you maximize the impact of your eyes.

Blue Eyes are best enhanced by shades of color that are Orange or Peachy in tone. Be sure to adjust your color choices for the shade of blue in your eyes. The darker the blue of your eyes the more rich the corresponding Oranges and Peaches should be.

With Green Eyes, the color best suited is Red. Admittedly, red is a less-common eye shadow color, but by choosing red-toned and “spicy” shades you can make the green appear more vivid and lush.

For Violet Eyes, use soft golden tones and yellows with some shimmer in order to make the eyes appear luminous and to make the color pop.

Finally, the most common eye color is Brown, which is given tremendous amounts of warmth and vibrancy when accentuated with the cool tones of the blue palette.

Choosing Contouring Colors

 It’s time to talk about the single-most overlooked cosmetic product/technique by the average woman: contouring make-up. With the right combination of highlighting and lowlighting shades, you can adjust the look of your features in myriad ways. You can make your nose appear slimmer, your eyes deeper and your jawline softer. You can soften the look of jowls and hide the wattle beneath an aging chin. All it takes is a little practice, some patience and just the right colors for your skin type.

      I’m going to break with tradition here and tell you now that there is NO need to go out and purchase make-up specifically labeled as contouring make-up. In fact, some makers are getting away from the “specifically purposed” cosmetic products and appealing to the modern shoppers’ sensibilities by marketing the products that are basically the same as multi-purpose items.

      The truth is you don’t need a specifically designed “contouring make-up” for proper contouring of the face all you need is a make-up that is a shade darker and a shade lighter than the make-up you use for your foundation. It’s just that simple.


What Kind of Foundation Works Best

      You can use any foundation formula for your contouring make-up, and if you have a brand and type that you absolutely cannot do without, then by all means stick with what you love. It will make it easier for you to master the contouring application techniques if you feel comfortable with the medium with which you are working.

      However, it’s my opinion that the newer “mineral powder” make-up formulas are ideal for use as contouring make-up – even if you prefer to use a liquid or cream foundation. In fact using a powder make-up for contouring over a moister foundation application can actually work well for many skin types. Just remember that the goal is ultimately to create very blended looks. This won’t be possible if there’s too much moisture, so apply your foundation in smooth, thin, even coats and blend it in well.

How to Know what’s Right

      In order to choose the right colors, it’s going to be necessary to go where you can “test” the make-up. Unless you are very familiar with the whole range of shades for the make-up your are working with, or you have loads of money to spend, the test is best.

      This testing is doubly important if you are going to use a different formula of make-up to the kind you use as a foundation. If you plan to use the mineral powder formula and you regularly use liquid foundation, it will help you to get a feel for the way the minerals are applied and how they blend.

      Find your base shade, then look at the shades one step lighter and one step darker than your base shade. Remember that your base shade should apply to the skin and become invisible. If you can see where the make-up is applied because it is lighter or darker than the skin around it, then it’s not appropriate and you need to shift to the next shade.

      Once you have the proper shade for your base color, look at the shades next to it on either side. Select one shade lighter and one darker and apply them next to the test of the color that matches your skin tone. The difference between them should be subtle, but apparent when side by side. You’ll blend out the demarcation lines when you apply the contouring. In some cases, you may need to go to the shades two steps from the one you use as a base if the transition between the shades is very minute.

  Once you’ve chosen the contouring colors for use with your foundation, you’re ready to master the contouring basics.

Basics of Contouring

      The entire concept behind contouring is the theory of the interplay of light and dark to create depth and perspective in drawn and painted shapes in artwork. Just as an artist can take a plain, white, flat piece of paper and through the use of lighter and darker colors and shading can create an image that looks three-dimensional (even though it is still only a flat surface).

      Once you apply your foundation and allow it the proper amount of time to set (using translucent powder as appropriate), you can begin trying out your contouring techniques. If there is a feature you want to enhance, such as the cheeks, apply the darker contouring shade in the hollow of the cheeks by puckering your lips and dabbing the color on the underside of the upper curve of the indention. Then apply the lighter shade lightly to the top of the cheek bone in the same manner. Afterward, use a blending brush to gently smooth away any sign of demarcation.


Long Hair vs Short Hair

When you have long hair you want short hair and when you have just had your hair cut you decide to grow it long. When will we ever make up our minds? As children our parent’s decided how we were going to wear our hair and we were so busy playing we barely gave a thought to our locks. Now as adults we want to look our very best at all times, especially when we dash out on a moment’s notice. We don’t want to spend hours primping in front of the mirror, but still want to look like a movie star - as if we were born that way.


The advantages of long hair are the versatility of so many styles offered. You can wear your hair up in a myriad of ways. Or, you can wear it half up and half down. You can fashion it like the Queen of Sheba or be the picture of a rock star bedazzled with glitzy jewels and scarves. Braiding can be classy surrounding a smooth updo appropriate for a Princess. Braids upon braids can achieve a sophistication desired to influence others. A fluffy bedraggled look gives the impression of just getting up in the morning. Men love its sexy appearance. A multiplication of attention can be gained through foiling your long strands blonde, strawberry blonde and copper red over light or medium brown hair. Golden hues would also look flattering on any warm browns. Oh so lovely when up or down. You will feel like dancing!

“Rapunzel, Rapunzel let down your hair!” cried her friend, as he looked longingly to her. So long was her hair supposed to be, one could climb up the side of the high tower to get to her and so the story goes. Is long hair for you, though? Would it connect with your lifestyle and make the most of your face and body?

As women age most of us gain a little weight and become gray (I like to call it platinum). If you are overweight and have long hair, chances are you aren’t looking your best. Long hair puts weight on you when you look into the mirror. Have you ever noticed how hard it is to look neat with long hair when you are trying on clothes? There aren’t too many of us who are older who look good with gray or tinted hair hanging around their shoulders. Let’s face it, we aren’t 20 anymore, but on the other hand we don’t have to look our complete age either. Long hair can be - oh, so hard to give up. We love our long hair don’t we?

If you have thin fine hair, keeping it long will only make it look thinner and stringy at the ends. Cut bluntly, into a bob not quite touching the shoulders, or shorter, will give the awareness of thicker hair and will feel fuller as well. Use a good volumizer to complete this potential. Everything today is product and more product. If you have long thick hair, shaped into slivered layers will give you several options whether it be straight, wavy or curly. The world is yours.

Enter short hair. There is more maintenance, although an easier task. Short hair will take off at least 5-10 lbs on a good dress. Perfect shaping from a good visionary stylist who knows what you need will do wonders! Short hair is so healthy, you never have a chance to get split ends because a trim every six weeks will be in order. You use less shampoo and conditioner and depending on your style, you will look younger and neat all of the time - no matter what you are wearing.


Believe it or not, there are many styles you can wear for short hair. Real short hair shingled up in the back will not look good on a heavy lady who has a thick neck. A nice fringed affect that laces around the edges would look much more feminine. Neither do you put a mushroomed bob on a heavy lady.

This will only cause her to look shorter and heavier. However, a cut about 1 ½ inches away from the head and blown upward will lessen the droops, sags or wrinkles. Bring everything up with the lower part of the hair cut a little bit closer. Half waves and large curls will bring a much needed softness around her face up and down. The upper part of the hair goes up and the very lower part is fluffed down, but not smooth.

Just because you’ve chosen short hair doesn’t mean you’re going to be a clone. You are unique and original. Your hair should fit your personality as well as your body image. If you are athletic, a smart cut close to your head, with golden/reddish highlights, over a lovely brown would shimmer in the sun. Without a care, heads will turn complimenting your energy.

Perhaps you are older and have arthritis and cannot fix your hair like you once could. With a good shaping you could have a very light wave that wouldn’t be any work for you. Dampen your hair, comb and push it into the relaxed curls that look like you were born that way and voila! Everything stems from a good haircut. You can have the best color and a great permanent but if you didn’t get a good shaping it won’t bring out the best of what you have.

Whether it be long hair and you decide to wear it up as you get older or short hair, the important thing is for you to listen to the desire of your heart but not be afraid of change either.

Of course, like they say “It will always grow back.”

Beauty Benefits of Cucumber for eyes,hair and skin

Cucumber is a widely cultivated plant and also the oldest cultivated crops. It  belongs to the same botanical family as melons and squashes. It is very low in calories and rich in fiber,so makes a perfect diet food. According to World Health Food “Cucumbers are a valuable source of conventional antioxidant nutrients including vitamin C, beta-carotene, and manganese.” It also has a high amount of vitamin K. Cucumber peels are rich in dietary fiber that helps reduce constipation. We would have enjoyed cucumbers in fruit and vegetables salads, but do you know that it has lot of beauty benefits for eyes, hair and skin and is also a popular ingredient in many skincare products.


1.Cucumber in your diet- Beauty begins from inside. Cucumbers are 95%water, is a natural coolant and  helps in keeping the body hydrated. Because of the high water content, they help in cleansing the system of toxins. So it is good to include them in our diet in the form of salads, cucumber buttermilk, cucumber raita etc.
2.Cucumber is a natural toner, has cooling properties and helps to improve a dull greasy complexion.  It is used as an astringent to cleanse the skin. Grade or puree cucumber in a blender,sieve and extract the juice. Apply the juice all over your face and neck, leave it for 30 minutes and rinse well with cold water. It also helps in cleansing the pores.
3.Cucumber is a great ingredient for lightening the skin. It is a natural bleach. Mix 3 parts of cucumber juice with one part of lemon juice and apply this mixture all over the face and neck leaving the eyes and lips. Leave it on for 15 minutes and wash off with cold water. Use this face pack  regularly for best results.
4.Cucumber Yogurt Hydrating mask for dry skin-Cucumber juice mixed with equal quantity of  natural yogurt heals sunburn and also hydrates dry skin. It prevents blackheads and dryness.
5.Cucumber juice mixed with equal quantity of raw milk  helps in soothing sun burnt skin.
6.Cucumber for glowing skin – Make a face pack with cucumber juice, few drops of lemon juice, pure sandalwood powder and fuller’s earth powder. Apply it on your face and neck. Rinse it off after 15 minutes for a  youthful and glowing complexion. This pack helps oily skin and also lightens freckles.
7.If you suffer from oily skin, rubbing cucumber slices on the face helps remove extra oil from the skin.
8.Cucumber anti tan mask – Mix  2 tbsp of powdered oats with  2 tsp of  plain yogurt and 2 tsp of  cucumber juice . Apply it on your face and rinse it off after 15 minutes.  It not only helps remove tan but also improves the texture of the skin.
9.A pack make of  equal quantity of cucumber juice, lemon juice and mint juice can help to reduce pimple marks or scars. Application of fresh cucumber juice can reduce freckles.
10.Cucumber anti wrinkle mask- Mix together 2 tbsp of  cucumber juice, little egg white and a tsp of lemon juice, apply all over your face and rinse it off after 15-20 minutes to keep wrinkles at bay.

Cucumber for eyes
11.If you are suffering from puffy eyes,  place cucumber slice on closed eyes and relax for 15 minutes. It helps reduce water retention and puffiness of eyes.
12.Applying cucumber juice helps to get rid of dark circles around the eyes.
Cucumber for hair
13.The high silicon and sulphur content in cucumber juice promotes hair growth. Apply cucumber juice to your scalp, leave it for 15-20 minutes and wash it off with a good shampoo or shikkai.
When you make your own beauty packs at home, you can be sure that you have used only all natural ingredients and they are cost effective. Go ahead and use this humble vegetable in your beauty regime!!!

What it Takes to Lose Weight

What does it take to lose weight?

To lose weight, you have to eat fewer calories than your body uses. Calories are the amount of energy in the food you eat. Some foods have more calories than others. For example, foods that are high in fat and sugar are also high in calories. If you eat more calories than your body uses, the extra calories will be stored as body excess fat.
A pound of fat is about 3,500 calories. To lose 1 pound of fat in a week, you have to eat 3,500 fewer calories (that is 500 fewer calories a day), or you have to "burn off" an extra 3,500 calories. You can burn off calories by exercising or just by being more active. (Talk to your family doctor before you begin any type of exercise program. Your doctor can help you determine what kind of exercise program is right for you.)
The best way to lose weight and keep it off is to eat fewer calories and be active. If you cut 250 calories from your diet each day and exercise enough to burn off 250 calories, that adds up to 500 fewer calories in one day. If you do this for 7 days, you can lose 1 pound of fat in a week.
Many experts believe you should not try to lose more than 2 pounds per week. Losing more than 2 pounds in a week usually means that you are losing water weight and lean muscle mass instead of losing excess fat. If you do this, you will have less energy, and you will most likely gain the weight back.


How often should I eat?

Most people can eat 3 regular meals and 1 snack every day. The 3 meals should be about the same size and should be low in fat. Try to eat 1 to 2 cups of fruits and vegetables, 2 to 3 ounces of whole grains and 1 to 2 ounces of meat (or a meat alternative) at most meals.
Some people benefit more if they eat 5 to 6 smaller meals throughout the day, about 2 to 3 hours apart. For example, their first meal of the day might be a cup of low-fat or nonfat yogurt and a banana. Three hours later they might eat a simple deli sandwich with whole-grain bread and fat-free mayonnaise.
Eat breakfast and don't skip meals. While skipping meals may help you lose weight in the beginning, it fails in the long run. Skipping meals may make you feel too hungry later in the day, causing you to overeat at your next meal.
After about a month of eating a normal breakfast, lunch and a light dinner, your body will adjust.

What is so bad about high-fat foods?

Foods high in fat are usually high in calories, which could lead to unwanted weight gain. Consuming too much saturated and trans fats may increase LDL cholesterol ("bad" cholesterol) level, and increase your risk of heart disease. The USDA suggests that you eat no more than 20 grams of saturated fat, and that you limit the amount of trans fat to as close to 0 grams as possible. Click here for more information on reading nutrition labels.
It is important to remember that some fats can be beneficial to your overall health. "Good" fat, such as polyunsaturated and monounsaturated fats are found in fish, nuts, and low- or nonfat dairy products.

What are empty calories?

Some foods are referred to as "empty calories" because they add lots of calories to your diet without providing much nutritional benefit. An example is sugar-sweetened drinks, such as fruit juice, fruit drinks, regular soft drinks, sports drinks, energy drinks, sweetened or flavored milk and sweetened iced tea. These drinks can add lots of sugar and calories to your diet.
But staying hydrated is important for good health. To reduce the calories and sugar in your diet, substitute water, zero-calorie flavored water, non-fat or reduced-fat milk, unsweetened tea or diet soda for sweetened drinks. Talk with your family doctor or a dietitian if you have questions about your diet or healthy eating for your family.

Can I trust nutrition information I get from newspapers and magazines?

Nutrition tips and diet information from different sources often conflict with each other. You should always check with your doctor first. Also, keep in mind the following advice:
  • There is no "magic bullet" when it comes to nutrition. There isn't one single diet that works for every person. You need to find an eating plan that works for you.
  • Good nutrition doesn't come in a vitamin supplement. Only take a vitamin with your doctor's recommendation, as your body benefits the most when you eat healthy foods.
  • Eating all different kinds of foods is best for your body, so learn to try new foods.
  • Fad diets offer short-term changes, but good health comes from long-term effort and commitment.
  • Stories from people who have used a diet program or product, especially in commercials and infomercials, are advertisements. These people are usually paid to endorse what the ad is selling. Remember, regained weight or other problems that develop after someone has completed the diet program are never talked about in those ads.

Will diet drugs help?

Although diet drugs may help you lose weight at first, they usually don't help you keep the weight off and may have damaging side effects. Most diet pills have not been tested by the Food and Drug Administration, which means you can't be sure if the drugs are safe. Taking drugs also does not help you learn how to change your eating and exercise habits. Making lasting changes in these habits is the way to lose weight and keep it off.

Tips for Purchasing the Right Bracelet

It is often hard to choose the perfect bracelet. If it is for a gift, you need to consider the style and size as well as if you want it to match their rings and other pieces of jewellery. Here, we've listed everything you need to consider when purchasing a bracelet.


Consider the style of the jewellery you/they already have 

If it is for yourself, take a careful look at the jewellery you already have and consider whether or not you want your bracelet to match the other jewellery pieces you own. If the bracelet is a gift it is also important to look at the jewellery the person you are giving it to, already has.

A good way to find out their style is to look at what they have in their jewellery box or what sort of jewellery they wear on a daily basis. A good way to browse different styles of bracelets is from the comfort of your own home by searching the Internet. This is a great way to see what styles are currently on the market and also to get an idea of pricing before you make a purchase.

Think of the budget for what you want 

Once you have a budget set for how much you want to spend on a bracelet for yourself or for a gift, you can look at what you are able to buy for the allocated price. You may find that you have put aside more than what you need and can also purchase a set of earrings to match.

What metal is best for you/them

This is also related to the style you like. If you wear mostly white gold, it would be a good idea to buy a white gold bracelet to match the rest of your jewellery. If it is a gift, you also need to think about what the majority of their jewellery is made from. You may want to go all out on a gift for that special someone and buy a diamond bracelet to match the diamond rings they have.

Sizing it right 

Getting the sizing right for a gift can often be difficult. Some bracelets are adjustable so size isn't an issue. A good idea is to look at other items they wear on their wrist such as a watch, bangles or other bracelets.

Engraving of gifts 

Add a personal touch to your gift for someone special by having their bracelet or bangle engraved. A message from you to them or even a quote they like is also good. This is a lovely idea and something they'll have that will always reminds them of you.

Tips on Buying Women's Wedding Bands

The wedding band is a significant piece of jewelry, symbolizing commitment, love and passion. You can choose from many different kinds of women's wedding bands and engagement rings, including conservative bands, creative designer bridal sets and wedding bands covered in precious stones. It is important to weigh the options carefully when shopping forwomen's wedding bands to find the wedding jewelryt hat will be perfect for you or your bride.


Buying Women's Wedding Bands:


Consider sets: If you want a wedding band that coordinates well with your engagement ring, then you might consider purchasing a bridal set. Bridal sets offer a variety of style options and bring continuity to wedding jewelry. Bridal sets are available with plain wedding ringsdiamond wedding bands and wedding rings with intricate metalwork.

Browse: Give yourself the chance to consider a variety of wedding jewelry options. Some women will know right away that they want a traditional diamond band or a unique ruby-studded ring, while others will need to browse and take a little time to find the right one. If you are selecting a wedding ring for your bride without her help, consider many styles and varieties in the preliminary shopping step.


  1. Put style first: If you are shopping for your own wedding band, choose something that will go with your everyday style. If you are choosing a wedding band for your future wife, pay attention to her current jewelry and fashion choices. Elegant diamond wedding bands will appeal to the feminine, elegant woman, while simple bands will be perfect for the casual woman and unique wedding bands will be suit the eclectic woman.

Contemplate lifestyle: It is important to consider lifestyle when shopping for a wedding band. The wedding ring you choose should be comfortable to wear on a typical day. If you are in a profession where wearing jewelry is discouraged or impractical, consider simple wedding bands.

Consider gemstones: Gemstones can add beautiful detail to a wedding band. Diamond bands can complement a stunning diamond engagement ring. Diamonds aren't the only option when choosing wedding band gemstones. Rubies, garnets and moonstones, for example, symbolize passion and love, while blue sapphires symbolize loyalty. Many women like to add color to their wedding band with a bright pink sapphire or deep green emerald.

Blog Archive